In Part 1 of this review, we looked at the body and design of the edgertronic SC2X camera. Touched on the mount and available frame rates including a few new changes and some video samples. Part two is all about using and understanding the abilities and limitations of the camera as a high-speed tool for Film, TV, Science, Sports, Medicine and other industries.
The edgertronic SC2X is the culmination of a lot of engineering prowess and expectations for a full HD 1080p capable high-speed camera that is both capable and usable for the most demanding image quality trials. The 1,910fps speed is ideal for capturing a plethora of human and physical events that do not happen in the blink of an eye but over a few seconds. Sports videographers and Nature shooters will feel right at home with the resolution finally being big enough for the minimum submission guidelines of TV production and Film post.
Connecting and firing up the camera for the first time:
Once placed on a tripod or other stand using one of the two 1/4″ bolt screw mounts it is time to wire the camera up. The sequence in which you attach the cabling can be out of this order but we found it easier to do it in the following steps:
1) Insert a compatible SDHC card on the SD slot of the camera. The kit comes with an 8GB card but we tried a Sandisk 32GB Extreme 30MB/sec video rated card and had no issues (Make sure it is SDHC and not SDXC).
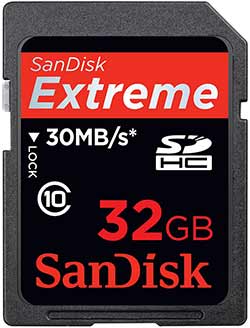
The cards have to be formatted in the FAT32 filesystem common to Windows machines of the last decade. FAT32 works on smaller sized storage fine and up to 32GB it should have absolutely no performance difference compared to other more capable file systems like NTFS. SDXC Cards will not work with the edgertronic so keep this in mind!
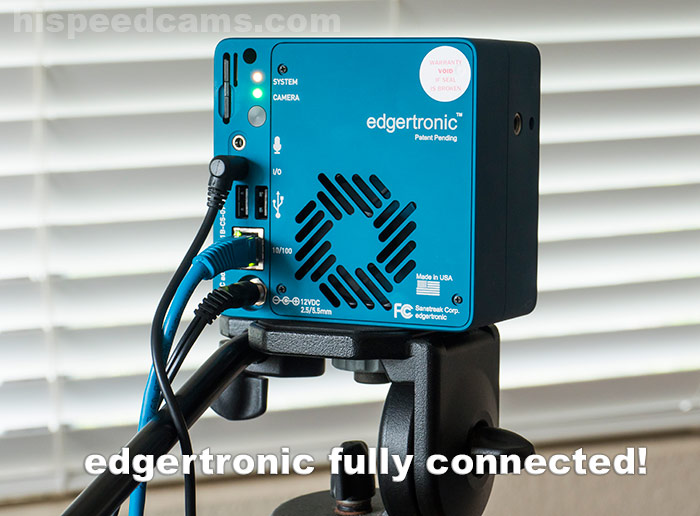
2) Connection of the 10/100 Ethernet cable shown in blue. Connect the other end to your PC, Laptop or wireless/wired router for easy connectivity to portable devices like smartphones or tablets.
3) Connect the wired trigger remote in its port. Connect the extender if you need extra reach (advisable)!
4) Connect the AC Adapter or 12v Adapter with a compatible Battery like the Bescor or Anton Bauer ie the new Vagabond Mini from Paul C Buff “$239” is capable of running the camera for over 8hrs straight.
Once you connect the power cable the camera turns on automatically and starts the bootup process “There is no Power Switch”. Booting up takes about 15-20 seconds including calibration it is really a non-issue since you still have to open the control interface on the PC, Mac or Laptop. The camera runs on Linux and you never have to fiddle with the system unless you want to test your own software code with the camera using the SDK here.
Setting up Networking:
The camera needs to be accessed through a 10/100 networked device that runs a web browser. edgertronic works best with the Google Chrome browser and while it worked fine on explorer and Apple’s Safari you really want reliability and stability when using the camera. Just use Chrome and save some headaches. We used Version 61.0.3163.100 64Bit of Google Chrome during our review and it was rock solid.
The easiest way in our view to access the camera without many configuration steps in a studio; is to use a router either wireless or wired with the camera. Plug in the Ethernet cable on a router that is also feeding a signal to your computer and just find the device by typing the IP address on the browser bar.
The router we connected to had the following IP address 192.168.0.1 and the camera had an address in that range, in this case, it was just a matter of changing the end number .1 to .2,.3,.4,.5.6 etc to find the camera. Our router assigned the number http://192.168.0.6/ to the edgertronic and worked every time on that address for the length of the review testing on the local network. Once you punch the address you are greeted with the edgertronic interface.
Network setup by direct cabling to computer: If you need to access the camera from your computer directly it needs to be configured first in order to talk with the edgertronic. The Ethernet cable needs to be connected from the edgertronic to your computer network port.
Network setup by direct cabling to computer: If you need to access the camera from your computer directly it needs to be configured first in order to talk with the edgertronic. The Ethernet cable needs to be connected from the edgertronic to your computer network port.
Your computer network settings should look like this:
- IP address 10.11.12.1
- Sub Net Mask 255.255.255.0
- Default Gateway: 10.11.12.13
Once you set up your computer this way you will lose your current networking except for being able to access the camera. If you have a laptop or desktop with an Ethernet cable and WiFi interfaces you can access the camera while retaining internet/local network connectivity without issue if you connect to your network through WiFi.
To connect to the camera in this mode you just need to type the following URL in the Chrome browser: http://10.11.12.13
The Camera’s IP is always 10.11.12.13 unless you decide to change it by entering the firmware change through a Telnet command line. We saw no sense in changing this easy to remember IP number.
Portable Configuration:
Marcus Ranum recommends using a wireless router, in this case, a ZyXel Travel Router. His configuration can be found here!

We have saved Marcus’s configuration in a PDF here if you need it for offline use. PDF Wireless router Configuration ZyXel.
If you want portability we urge you to get a wireless router like the ZyXel here for about $20. We used it a lot and it worked like a champ. The edgertronic begs to be portable and with this router, you can use any Apple or Android tablet with the Chrome browser and take the edgertronic anywhere with little trouble. As long as you have a good portable battery the router can be connected to the USB ports on the camera and be powered from there.
Camera Interface:
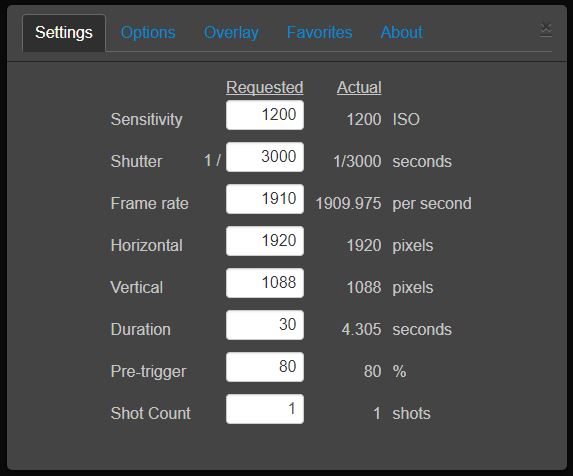
Once you connect to the camera you are greeted by a first connect greeting and agreement, once you say ok you are then presented with the basic main interface parameters.
The interface is programmed using HTML 5 with Bootstrap and is very responsive while looking modern. Floating windows and panels are movable around the screen to fit workflow.
Settings are divided into two columns, one for Input which is the Requested column and the Actual which is the value that will be applied. Actual lets you see in advance how the hardware will behave with a certain set of parameters before applying the changes and start calibration. This saves time and guesswork and lets you learn the features of the camera and its limitations.
Settings available on the standard interface as follows:
-Sensitivity: Lets you input ISO sensitivity in single unit increments see our ISO 1202 below. You have the freedom to choose the ISO increment according to your available light to within a single unit and not to hard-locked parameters. This is a great feature to have to use the best quality compared available light! For example, ISO 1250 can be used to add just enough sensitivity without altering the quality of the image perceptively.

The ISO on the color only edgertronic SC2X goes from 1200 to 19,200.
-Shutter: Lets you choose a specified shutter speed. The scale goes from 1/30th of a second to 1/797,619th of a second. This box also lets you set shutter speed by the single digit, in this case, a frame by frame increment. If you need a specific number to avoid some flickering in your light source you can do so by finding that parameter by increasing or decreasing the value with 1 unit precision.
-Frame Rate: Lets you choose a specified frame rate you need for the shot. The scale goes from 30fps all the way up to 20,132fps- resolution dependent and fixed in the horizontal at 1920 pixels. It can be adjusted by single digits and while not all values result in an actual precise value, the frame rate is within 1fps from the requested input value. It is still an extremely flexible frame rate that very few cameras allow. (Note: Sometimes you will have to increase the shutter speed at least 1/100 more than the desired frame rate to get such speed. Has to do with some sensor parameters)
Vertical: Lets you select the vertical resolution of the frame. From a low of 96px to a high of 1088px. Single digit input but with auto adjustment to the closest sensor supported resolution.
-Horizontal: The edgertronic SC2X is Locked at 1920 pixels for the horizontal at all resolution settings and frame rates.
-Duration: Lets you specify the shot recording duration in seconds up with up to hundreds of a second or two decimal places. i.e. 1.22, 2.38 3.88, 4.87 etc… The maximum duration is dependent on resolution and frame rate, for example recording at the lowest settings of 1920x96px which is the lowest the camera can go resolution wise, will yield a memory buffer recording of 3,106 Seconds at 30fps and 4.63 seconds at 20,132 fps the highest the camera sensor can go. That is a whole lot of recording at 30fps which is not really that useful unless you are recording a live event of 74 minutes non stop, of course, you will not be using a high-speed camera for that.
At the other end of the spectrum at the Full HD resolution which is 1920px * 1088px and at 1,910fps using the 16GB memory buffer on the SC2X, delivers 4.305 seconds which is actually a pretty long time in slow motion action. That would be 8,222.55 frames recorded or 274 seconds played back at 30p or 4.56 minutes.
The following chart shows common resolution and frame rates possible on the edgertronic SC2X:
| Resolution edgertronic SC2X | Frame Rate |
|---|---|
| 1920*1088 Full Sensor | 1,910 fps |
| 1920*736 HD 720p equivalent | 2,814 fps |
| 1920*768- 1024*768 equivalent | 2,698 fps |
| 1920*672- 768*688 equivalent | 3,079 fps |
| 1920*576 | 3,585 fps |
| 1920*480- 720*480 NTSC equivalent | 4,290 fps |
| 1920*480- 640*480 VGA equivalent | 4,290 fps |
| 640*352 Half HD | 5,816fps |
| 512*288 | 7,073 fps |
| 1920*224 Half VGA Equivalent | 9,025 fps |
| 1920*160 | 12,463 fps |
| 1920*128 | 15,395 fps |
| 1920*96 Lowest Res | 20,132 fps |
- Note: All resolutions on the table above can only work at 1920 px horizontal. This does not impact final frame rate performance. The sensor is locked on the horizontal resolution!
-Pre-Trigger: Most high-end high-speed cameras have what is called a Pre and or Post trigger function to be able to predict and catch the action during the limited time frame the camera records. ![]()
The bar above shows a pre-trigger of 50% default which is highlighted in green. The 16GB in the camera memory is segmented in two at 50%, 8GB in green and 8GB in gray. For a 10 second record time, for example, it means you get 5 seconds recording before you push the trigger and five seconds after.
You can alter the pre-trigger number in single digit increments from 0% which means you won’t have to record unless you press the trigger in which case will give you the full buffer after and or at 100% which means the camera records up until the point the trigger is pressed.
Depending on your shot you will need to alter the pre-trigger value in order to capture the action. If you are a single shooter that will also be performing the action “i.e. popping a water balloon” it makes sense to allow a pre-trigger of 100% to capture the pop until by pressing the trigger you stop recording. The balloon has already exploded, water comes out and no action remains. If you are waiting for a lighting to strike you will also need a large pre-trigger value or the like so you capture the lightning in the pre-trigger buffer and stop after it passes when you press the physical trigger.
Shorter pre-trigger values are needed for catching wildlife like birds and dogs as a 30% for example gives you time to react press the trigger and record the secondary motion after the initial subject movement. If you want to run yourself or jump framed in the shot you will need no pre-trigger and put it at 0%, then after clicking the trigger you will perform your action and it will record for the specified duration in seconds.
The flexibility of this system cannot be understated as it reduces the chances of false captures or failed keepers and the buffer is long enough to allow for some or a lot of wiggle room depending on your agility and preference.
-Shot Count: This setting is quite a wonderful addition to the camera. It was planned to be supported in hardware from the start and it works by splitting the buffer into the shots specified according to the time allowed. For example, if you have 9 seconds of the buffer at your specified resolution and frame rate at 1 shot, then you could ask for 3 shots in this parameter and get shots that last 3 seconds each all with their respective Pre-trigger percent number % as selected in the pre-trigger box.
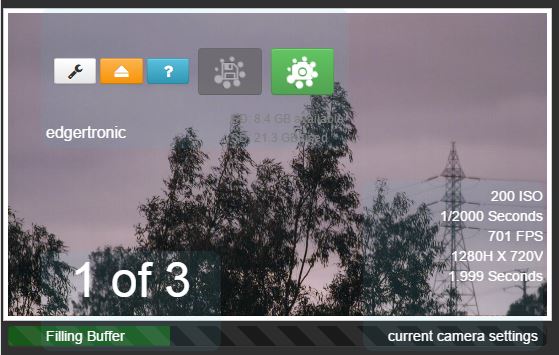
If you record in shot count mode you get the interface above which lets you know how many shots remain and lets you record them to the SD card before all of them have been shot in case you don’t need another take. If you are doing a lot of repetitive actions that require patience and endurance then multi-shot Shot Count is for you. If you wanted to record lightning during a storm you could record quite a few before the card writing process begins which will give you more chances to get a great sample.

At 1,910fps 1080p Full HD we were able to get 4 shots of 1 second each which considering how slow a time frame it is you will spend several minutes waiting for the camera to record the actions.
Recording the first shot:
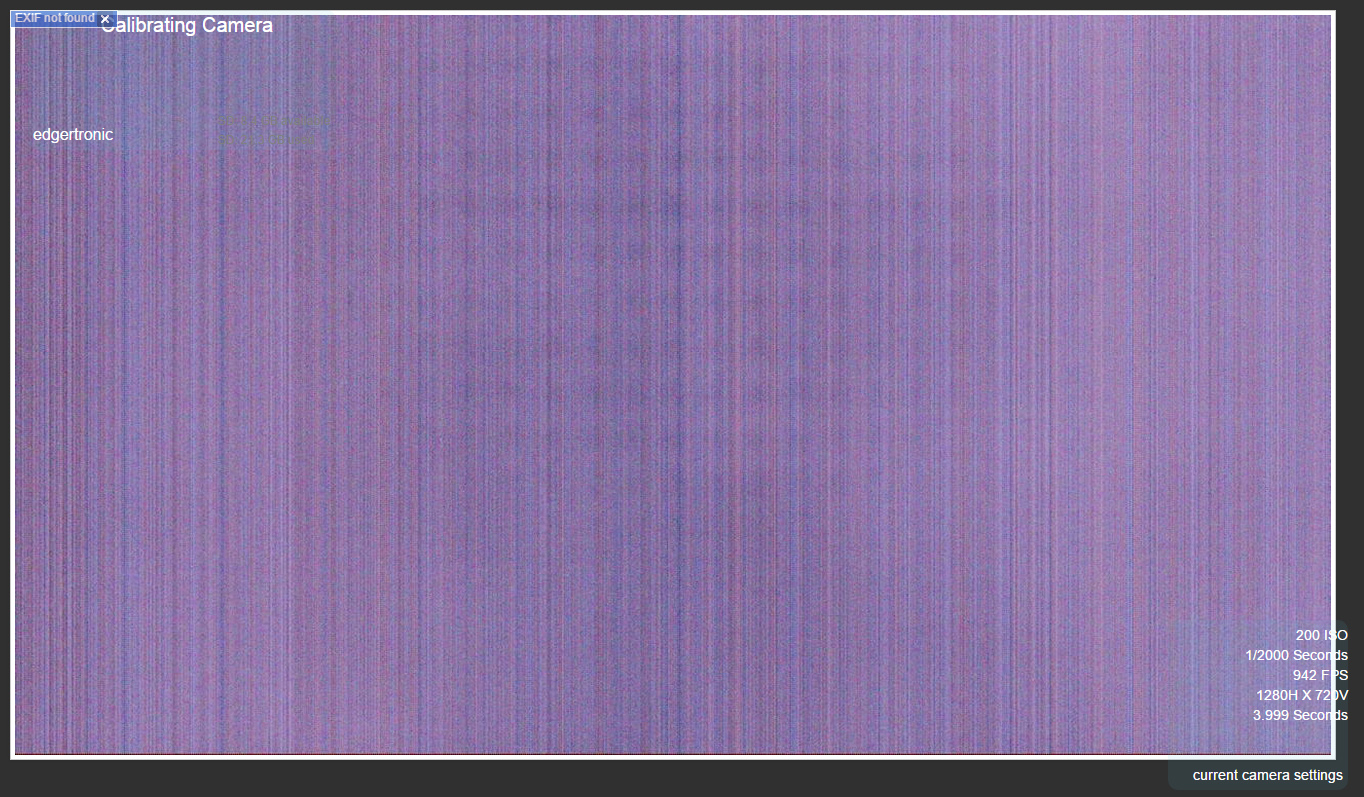
Calibration With Included Shutter for Black Cal: After settings have been entered and the settings window is closed on the X close mark or the mouse clicks outside the settings window area; the camera will do a quick black calibration step which sets the sensor mode to the parameters requested by the user and does a series of dark frames by closing the physical camera shutter “making an electronic audible noise” for an instant and taking some exposures. The image will momentarily change to a series of vertical noise pattern lines which is the sensor’s noise pattern. The camera uses this frames to cancel out the signal noise and produce the best image quality for that mode.
The edgertronic SC2X does this automatically which is a big plus as some other more expensive high-speed camera solutions require manual calibration after each settings change which is a time-consuming process. This is an impressive feature that works perfectly and makes the camera extremely friendly and dependable at the same time.
Recording:
The camera is ready and the blue and green LEDs on the back are steady which means settings have been entered, calibration happened and it is awaiting a trigger event from the controller, software or the back plate multi-function button.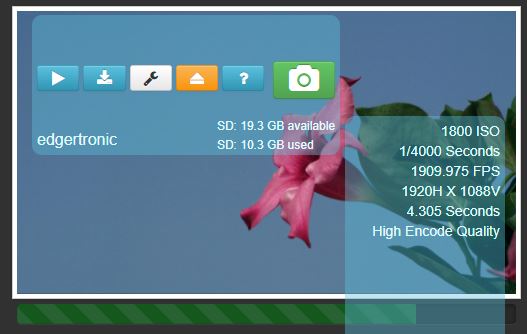
The above shot shows our settings on the right, 1800 ISO, 1/4000 shutter, 1088p resolution, 4.305 seconds duration and 1,910fps.
![]()
The camera icon is the interface trigger button and if pressed it will start a recording event. You can also do this by pressing the manual trigger controller or the Multi-function button on the back of the camera. Once pressed the buffer will begin to fill and record the shot.
Files and Saving the recording:
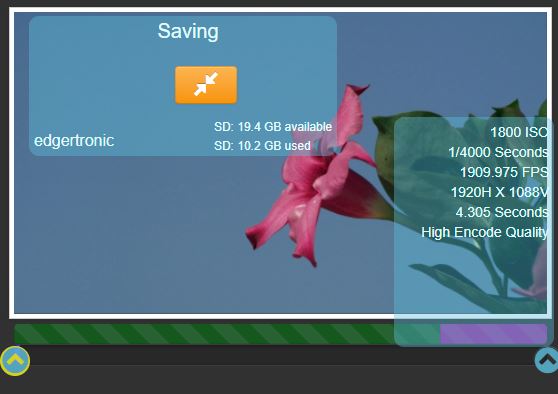
The saving process shows the post-trigger buffer filled in Magenta color and the actual SD card or Hard drive saving process on blue filling on the bottom dark gray line. For every second that passes in the blue saving bar, the camera has saved give or take 30+ frames or a little over a second. However, depending on frame content the encoder could take more or less time to save depending on the complexity of the image. For extremely detailed shots saved in the high-quality mode which is default, the 1080p capture could go as low at 22fps encoding. The process is still quick considering the camera is encoding to H.264 at huge bit rates for 1080p video, orders of magnitude higher bit-rates than common portable camcorders. In our testing, it was common for a 1 second of high speed recording at 1080p Full HD, 1,910fps to meet or exceed 500MB in space when saved in at 30p frame rate. So a buffer of 4 seconds would record 2GB of data to the card which is a time-consuming process. Your pre and post trigger events, as well as the Review before save feature, will help you reduce your card usage and get action more precisely in the time allotted. With practice, it will become second nature.
The video encoder: The H.264 encoder in the edgertronic SC2X is a variable bit rate encoder. It allows for low bit-rates when the frame contains few elements and or very high bit rates when the frame has huge detail. The encoder is so good that it delivers a very gradable image with great highlight roll-off and very few artifacts. You would be hard-pressed to find any compression artifacts in edgertronic footage. Even after heavy grading and curves adjustment the codec held it’s own. Motion is beautifully smooth and small details like minute dust particles are completely retained. Click on the image below for a full frame sample at 1080p.
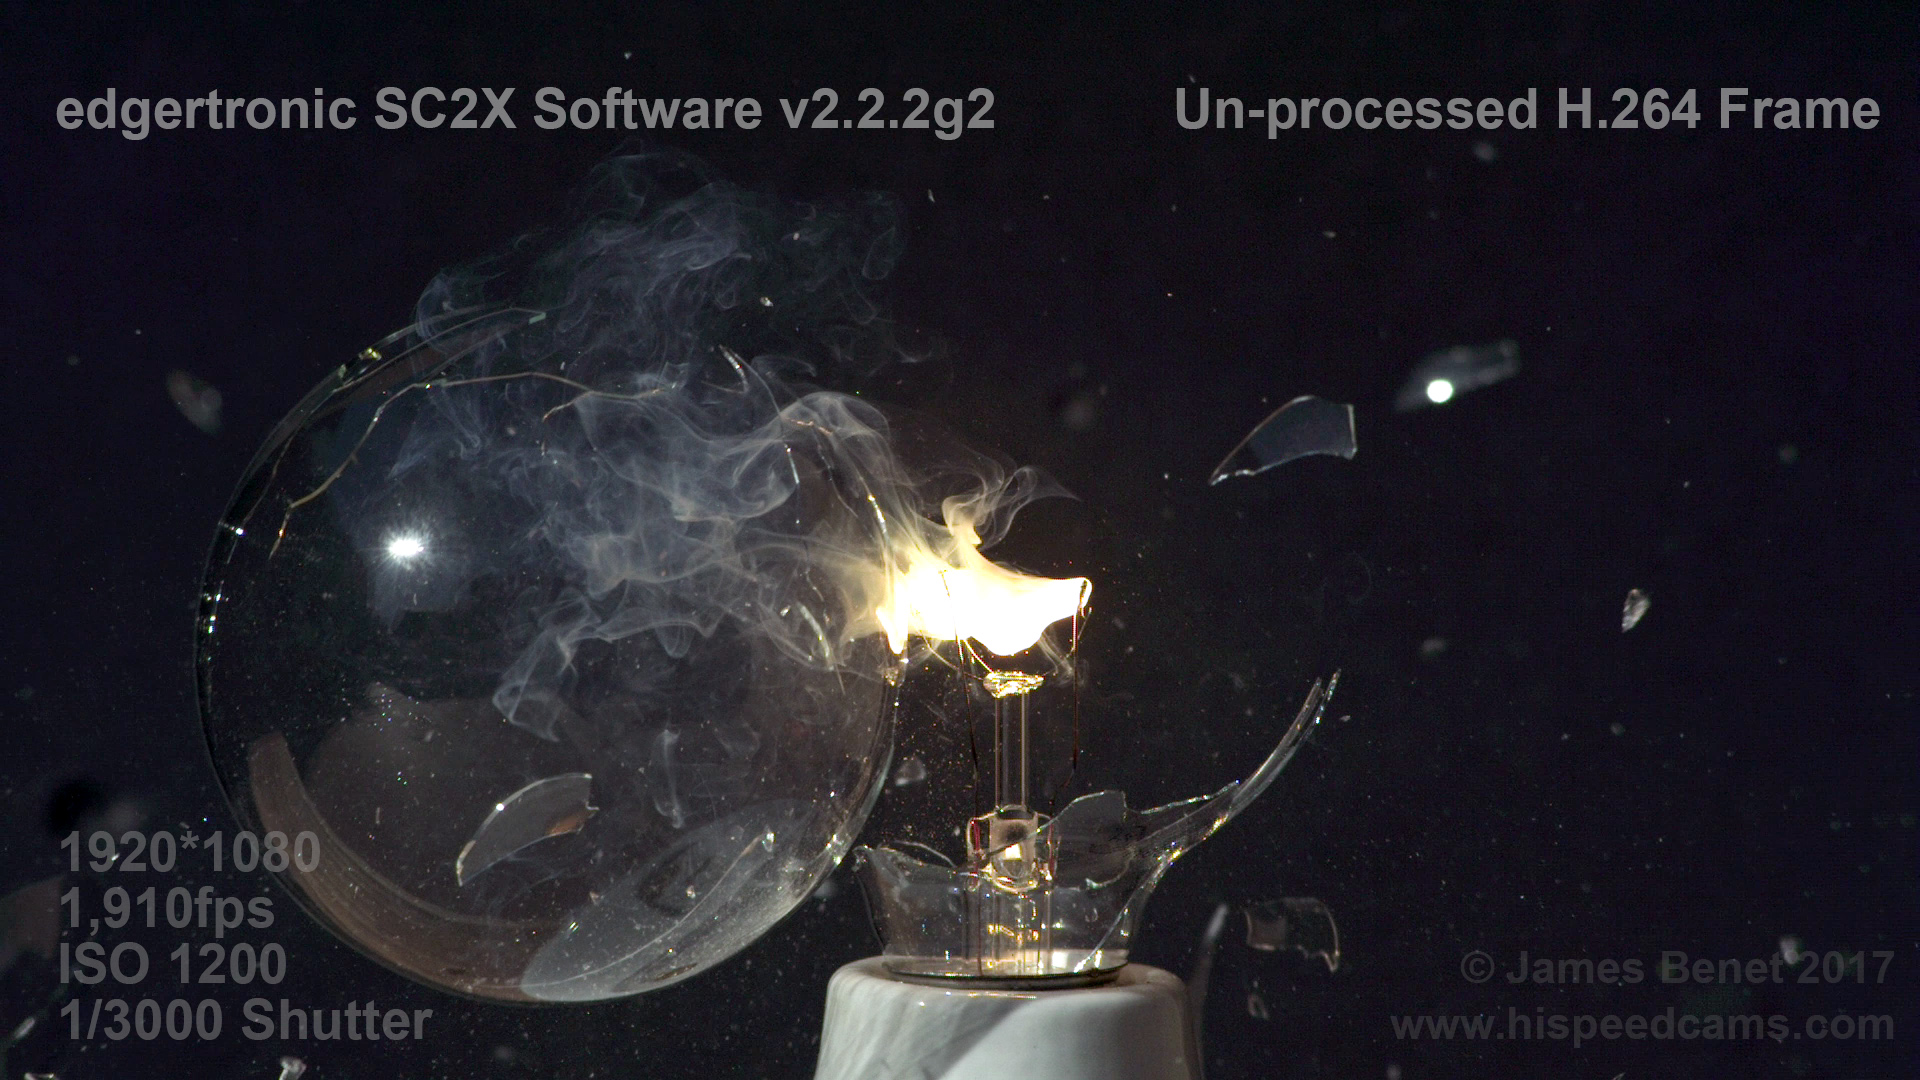
In the above sample, the encoder delivered 57.6 Mbps for the 1080p image. This is a huge amount of bit rate for slow motion Full HD resolution. Most consumer and some professional Full HD 1080p cameras record at a rate of 15-24Mbits/sec. You are getting a quality image here no doubt about it. The encoder can predict in advance any significant changes in the image as the data has already been captured. On the fly camcorder encoders have very little buffer to look ahead which means a harsher motion vector implementation that can cause image tearing artifacts. The edgertronic is cheating in a good way as it delivers the utmost image quality from its H.264 encoder by looking ahead and back at the data and choosing the appropriate amount of bits that won’t sacrifice image quality.
The camera can record anywhere from 35 Mbits/sec to 60+ Mbits depending on scene complexity with its variable bitrate encoder.
Video Encoding Quality Options: The edgertronic SC2+ allows for High, Medium and Low predetermined settings plus a Custom Mode.
Medium offers around 20% file size savings compared to High and similarly Low saves around 30%.
Custom, is for those who want to control the camera’s video processing pipeline. The pipeline is described in a text file which can be provided by the user in the form of a configuration file.
The video processing pipeline file used by the camera can be retrieved from the web address here:
- http://10.11.12.13/static/etc/pipelines_factory.txt
- More Custom info at the edgertronic Wiki Here!
The case for RAW Recording: Most professional high-speed cameras deliver their data as RAW image data sequences or TIF image sequences. Which give 10, 12 or even 14 bit color data in the process. The edgertronic captures in H.264 at 8 bit which is perfectly usable for most jobs but lacks that extra bit depth that can save that under or overexposed shot. If you needed perfect gradation with no banding even in extreme circumstances you would need RAW but while testing the camera we found no instance where we thought we needed that extra information when it came to color gradation.
1080p Full HD resolution is high enough to be more demanding than the typical 720p camera that shoots high-speed. Furthermore, the color accuracy of the camera is exemplary with less than 2% deviation from our chart when using 5,600K daylight LED lamps and the Sun. The highlight retention and dynamic range of the camera which we think is close to 11-12 stops have been proven more than adequate for our tests. If highlight retention is your goal then dialing a faster shutter speed would alleviate any overexposure on the image.
The shadow areas are very clean at base ISO 1200 and lifting them produces very few artifacts. The files are very gradable and applying color 3D LUTs works fine if needed when used in moderation. We wish there was a way to scrap the edgertronic’s default S curve and get a flat profile out of the camera. This would allow for easier grading to mix it with other cameras.
TV and film are the edgertronic SC2X’s primary market so this is something that should be offered in a future firmware update. Furthermore, RAW DNG support should be an option at the time of saving as a simple checkbox on the GUI interface. RAW DNG is an open standard that should be implemented on the SC2X to give full sensor data for highlight recovery and uncompressed quality. Recording time and file sizes would take a big leap but a camera that aims at the production market needs the utmost quality possible.
If in the future the edgertronic allowed for RAW capture on DNG sequences or similar formats we have little doubt the vast majority of users would still default to H.264 for High Quality Setting encoded footage. It works, it is of very good quality and your storage will thank you!
File Wrapper: The video files are saved as H.264 codec video streams in a Quicktime .mov wrapper. This is ideal and compatible with both Mac and PC computers and Linux workstations with compatible players. If needed, changing the file extension from .mov to .mp4 lets the files play on any player that can playback MP4 files. In short, you won’t find any video compatibility issues with this camera video file format.
File size and cutting length of files: The file size of the videos captured is based on the bit rate size, image frame size and the duration. Some of our clips passed the 2GB mark but most were under 500 MB as we truncated the duration either with time or while saving a clip with the interface Truncate Button or the new Review Before Save feature implemented in the latest software.
While saving a video you can stop the recording at any time which will cut or truncate the video from that point forward. If the action in your footage has already happened you can cut the tail end of the footage and save time and space. Our 32GB card was able to record about 70 1080p resolution 1 second 1,910fps videos before filling up. That is quite good mileage for a high-speed camera of any sort. If it was RAW the entire card would fill before reaching 10 clips. You will get tired way before the camera has filled up from an entire day of shooting. Our longest stretch was 7 hours of shooting and we filled the full of the 32GB card.
Exif Information: The edgertronic camera records a complete exposure and recording information file Exif along with every video recorded as a separate .TXT text file an example of one below…
- Camera time: Mon Oct 9 20:58:14 2017
- Model: SC2X Color 16 GB
- Sensitivity: 2400 ISO
- Shutter: 1/4000 Seconds
- Frame Rate: 1909.97 Frames/Second
- Horizontal: 1920 Pixels
- Vertical: 1088 Pixels
- Sub-sampling: Off
- sub-sample
- Duration: 4.30529 Seconds
- Pre-trigger: 80.0073 percent
- Overclock: 0 level
- Extended Dynamic Range: 0
- levelGenlock: Off
- genlockForce monochrome: Off Sensor behaves normally
- Multishot Buffers: 1 buffers
- External trigger debounce: On 5 ms debounce delay after external trigger falling edge
- Review before save: On enable
- Notes: Overlay notes: Off disabled
- Overlay logo: Off disabled
- Overlay settings: Off disabled
- Overlay frame number: Off
- disabledActive pipeline: H264HIGH:pipelines_factory.txt configuration
- Pipeline Description: H.264 high encode quality
- Multishot buffer: 1 number
- Frame count: 8223 frames
- Pre-trigger frames: 6579 framesTrigger time: 1507582657 (sec since 1970)
- Trigger delay: 0.000103299 sec (time from trigger input to start of triggered frame)
- First saved frame: -4719 where frame zero is the trigger frame
- Last saved frame: -801 where frame zero is the trigger frame
- Genlock locked: NA
FPGA temp: 50 CFPGA temp at last calibration: 39C - DDR3 temp: 63 CDDR3 temp at last calibration: 50C
- Sensor temp: 45 C
- Sensor temp at last calibration: 34 C
- Time since dark frame: 58 minutes
- Time since power on: 1 hour, 2 minutes
Model number: 0x0003 Serial number: 0x037B - Hardware revision: 0x0002
- Hardware configuration: 0x1FF000A
- Build date: 20170901 (YYYYMMDD)
- IR filter: True IR filter is installed
- Sensor type: Color sensor
- DDR3 memory size: 16 GB
- Ethernet MAC address: 00:1B:C5:09:63:7B
- FPGA version: 63 Software build date: 20170921231402 (YYYYMMDDhhmmss)
- Software version: v2.2.2g2 release
As you can see, a lot of information is recorded which lets scientific, industrial and creative users extract useful information about the settings and conditions of the camera when a recording occurred and replicate a shot settings precisely if needed. This is a very easy and useful way to gather camera data. And or troubleshoot a camera if any problems arise This easily beats digging in the video file information for the data. This is a big workflow plus for the edgertronic.
![]() Once a video has been saved it can be played back directly from the SD card or hard drive that is connected in the USB slot. Only the last saved video can be accessed; if you need to see a previous video you need to examine the SD card or hard drive itself after un-mounting. Below is a screenshot of the video preview window after recording. You can start/Stop and expand full screen. This is a full resolution sample and identical to the one recorded on the card.
Once a video has been saved it can be played back directly from the SD card or hard drive that is connected in the USB slot. Only the last saved video can be accessed; if you need to see a previous video you need to examine the SD card or hard drive itself after un-mounting. Below is a screenshot of the video preview window after recording. You can start/Stop and expand full screen. This is a full resolution sample and identical to the one recorded on the card.
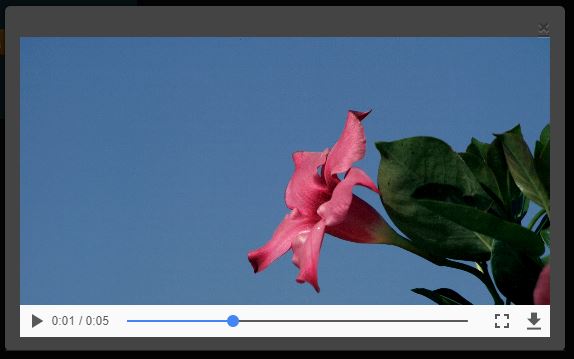
The Camera can also download to the host computer the last saved video .mov file from the SD card to the computer’s local storage. If you want piece of mind about a great shot and want to keep it as a backup it is a good option to have.
![]()
If you need to remove the SD card or USB Hard drive or Stock device for any reason you have an un-mounting button available that lets you do it. If you pulled either the SD card or hard drive while the camera is on, without using this eject button you risk of damaging the file system in the card causing corruption. Be sure to keep this in mind!
![]()
There is a Help button accessible from the main interface which opens a new tab in the browser and gives you a complete user guide and other troubleshooting information for the camera. This is independent of internet access as the information is located on the Micro SD card inside the camera body. You can never lose the manual because it is readily available. Good Thinking!
![]()
The wrench button is just the way back to the original settings dialogue box.
You will be using this button plenty. Going in and out of this mode will trigger a camera calibration event if frame rate, ISO, shutter speed settings change.
 In Multi-shot recording mode you loose the ability to play back your last shot or download the last clip. Which when a sequence is fully recorded should be available. You get new icons of record and stop recording which let you record all the multi-shot recording buffers or cancel the remaining buffers at any time.
Auto Fill Camera Settings Intelligence: The entire interface value panel adjusts to the entered numbers or by the lack of them. The interface and software for that matter are intelligent enough to show in the “Actual” column the outcome of filling or leaving fields empty. This is an extremely easy way to get to know the camera features and limitations. It is as if a genius of high-speed values was guiding you through the whole process and won’t let you make a mistake.
Lets say that your main interest for this shot is frame rate, If you Input 5,000 fps in the “Blue Marked” field you will not get a solution immediately because the camera defaults to 1/500th of a second shutter speed; this is too low for 5k fps you need at least the same number of frames as shutter speed in order to capture that many. The edgertronic will always like a bit more shutter speed than the frame rate requested so we gave the shutter speed a value of 20,000 shown in “Yellow“. 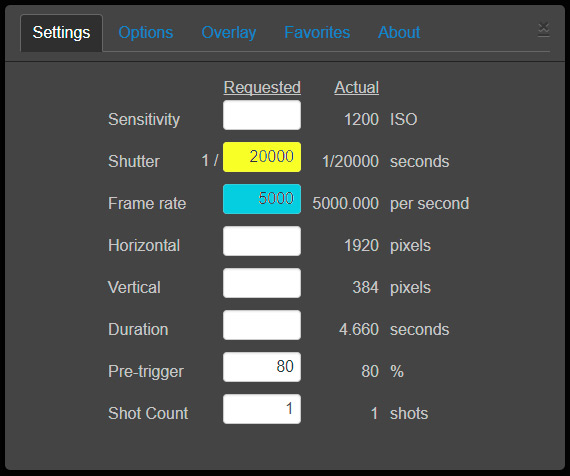 Now if you look at the “Actual” column you are given the effective resolution for 5000fps which is 1920*384 pixels along with the duration and a base ISO of 1200 which is the default. If you continue to modify values like upping the ISO or the resolution all the values will adjust accordingly.
The benefit of this entire intelligent Actual system is that without looking at a manual or spec sheet you can experiment with any resolution, shutter speed, ISO, duration and frame rate combination to get a shot. This is especially useful to get a vertical resolution like 1088p to stay fixed regardless of other settings. In that case, you will fill the Horizontal value with: 1920 pixels and the Vertical with: 1088 pixels. If you had a great idea for a shot rest assured, by using this system you will arrive at your desired settings very quickly.
Using the camera becomes second nature after a few days of use. You will estimate and learn how to apply the settings for any shot you might need by playing the values in your head and then trying them out. There is no harsh learning curve. Not only is the camera powerful & affordable compared to similar options, its also very user-friendly and logical.
edgertronic SC2X Footage Samples Part 1 @ 1910fps 1080p:
Settings – Beyond Standard Camera Features!
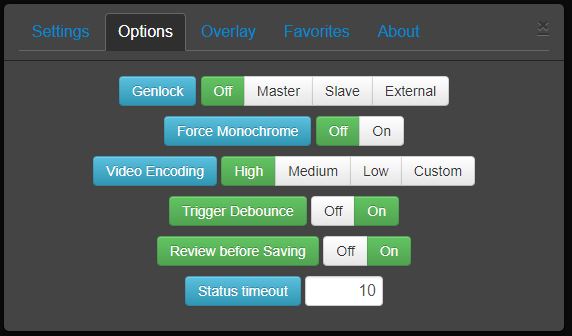
Clicking the Options Tab in the main interface, gains access to them.
The edgertronic SC2X Options let you go at it with several very useful features to get the most out of the camera and use it in a professional setting with more controls.
-Genlock: To quote Wikipedia “Genlock (generator locking) is a common technique where the video output of one source, or a specific reference signal from a signal generator, is used to synchronize other television picture sources together. The aim in video applications is to ensure the coincidence of signals in time at a combining or switching point. When video instruments are synchronized in this way, they are said to be generator locked, or genlocked.
Basically what that means is that a device or camera will sync or be synchronized by other deices or cameras. If you need to start recording on multiple cameras at the same time; like that needed for 3D recording applications Genlock is your friend.
Master- If clicked the camera will feed the signal to other devices. You will need to only record on this camera and the others will start recording at the same time.
Slave- If clicked will make the camera expect a signal from another camera to start recording and be timed synced. You will need to record from a device or another edgertronic on Master mode to start recording.
External-This mode lets an external timing source to control the cameras, could be made by a computer or custom Genlock timer.
Limitations on Genlock from the Wiki:
There are limitations:
- All cameras have to be configured for compatible timing (see below). For one-to-one frame lock, each slave has to be set to a frame rate that is greater than or equal to the master’s frame rate.
- The user is responsible to make sure all cameras can be triggered before issuing a trigger. There is no automated check that verifies whether or not a slave camera has completed saving the previously captured video, finished the calibrate operation, has available storage, etc.
When using genlock the cameras can have different duration, iso, percentage pre-trigger, and shutter speed settings.
-Force Monochrome: Allows the color version of the edgertronic SC2+ camera to record in Black and White only. This generates a slightly sharper image and compression data savings but will not equal the per pixel quality of a Monochrome sensor on an edgertronic. The Bayer filter on the sensor pixels will cause a resolution loss on any camera and the edgertronic SC2+ is not immune to this. If you need the utmost sharpness and low light ability then a Monochrome edgertronic is the way to go. In fact many labs and enterprise buy Monochrome cameras much more than color versions as they need it to analyze motion and not look at the colors.
-Video Encoding: Lets you select Low, Medium or High quality plus custom which allows you to tweak the settings in the configuration text file if you need other parameters outside the basics.
-Trigger Debounce: For code version 2.2.1 and above there is a user-settable debounce setting. If debounce is on, a 5 ms debounce delay occurs between the falling trigger edge and when the camera processes the falling edge. With debounce off, there is no delay and the falling edge is processed immediately.
-Review Before Saving: With the newest versions of the software it is now possible to enable reviewing a clip with easy In-Out Points on all edgertronic cameras. This was a major gripe we had while reviewing previous edgertronic cameras. This is a big deal and it is easily the most important feature added since our last review. It works solid and you can save any amount of clips with pre-determined in-out points you desire. If a shot contains events far apart it is very easy to isolate them and not save the entire frame buffer. Saves card space and isolates action. The camera is now frustration free in the save clip department.

You can see the (^) time selectors above which let you isolate a time frame for any framebuffer you have recorded. Only the selected clip region will be saved. The feature can be turned on and off if you need autosave of the entire buffer without user intervention.
-Status Timeout: Allows you to set a second limit for the interface overlay icons to fade away including all information and buttons. Goes from 1 sec to 100 seconds If you set it to 0 they will never go away!
Overlay Options:
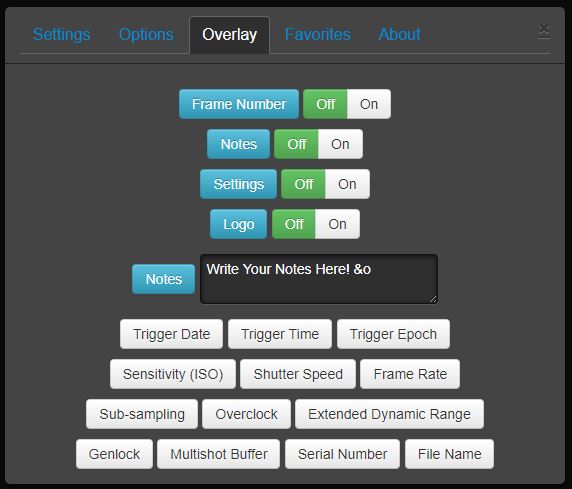
Overlay allows the edgertronic camera to display custom information and data on the screen and burn it in the recorded footage as well. This is ideal for all sorts of tests and scientific experiments as you can record the actual frame number associated with the time slider and add features like Notes “we used it to title shots” and a custom logo which you can edit. The camera pulls the logo from a file on the internal micro SD card on the camera. You can create custom logos and have the camera overlay them as needed.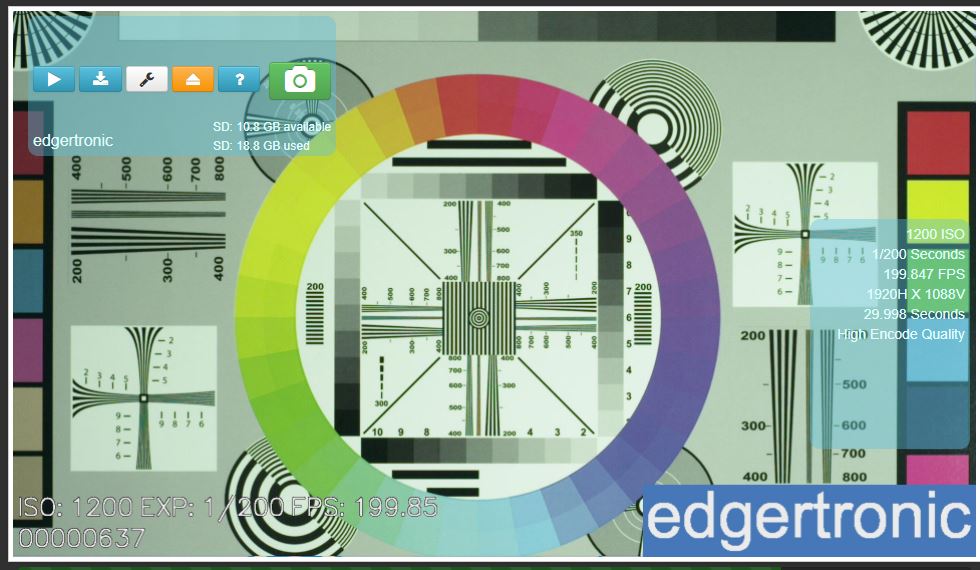 This is perfect for identification purposes and file logging. Overlay is a must-have feature for many and the current release of the edgertronic software has it available on all models of the camera; the SC1, SC2, SC2+ & SC2X all have the same software support.
Favorites:
The camera saves Presets or Favorites of the settings so you can recall them easily. It saves every parameter and overlay setting for easy set-up. This feature is a must-have for TV and Film production to get solid repeatable results for multiple cameras and lighting environments. The usefulness of this feature cannot be under-stated.
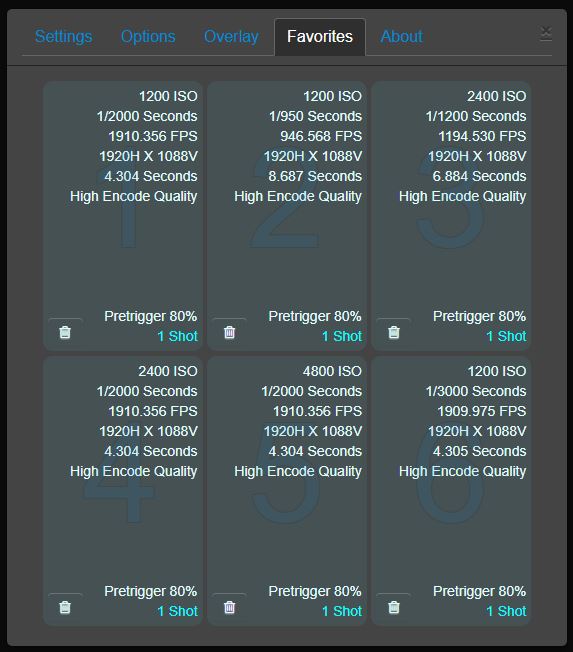
You can save up to 6 settings which will recall the entirety of the camera options with a single click. You get a dialogue box to confirm the selection and or overwrite. For example, 1088p 1,910fps is our most requested resolution setting and we have it in different shutter/ISO configurations.
With the Favorites, you can save odd resolutions and ISO setting depending on the shot you need without guesswork and time wasted. In the field, the recall of presets can mean getting the shot or missing it. Glad to see this implemented so well!
ISO Performance “Sensor Noise”:
The edgertronic has large pixels 10 micro-meters which is huge compared to common DSLRs which have 3.5 to 4 micro-meters pixel diodes. However the global shutter circuitry introduces noise and reduces the performance significantly compared to those rolling shutter prone DSLRs. See part 1 of this review for more on why the Global shutter is essential on a high-speed camera. Still , however, he edgertronic SC2X is extremely clean at base 1200 ISO, and holds well up until ISO 5,000. Given enough light the edgertronic works well up to ISO 8,000. Above that banding starts to appear and the signal degrades. It is still usable for scientific purposes but not ideal for TV or film production even with Noise Reduction post-processing.
Staying at ISOs 1200-4800 for image quality reasons yields excellent results. With some Noise Reduction using Neat video ISO 3,000-8,000 is very usable. ISO 10,000 has horizontal & Vertical banding that cannot be removed easily. We were hard-pressed to go above ISO 3,000 in our entire review. High-speed cameras need lots of light and if you give them that; high ISO settings are not used much as they will not be needed. If in doubt just add one more light before bumping the ISO. ISO 2400 is almost as clean as base and yields excellent results with good lighting.
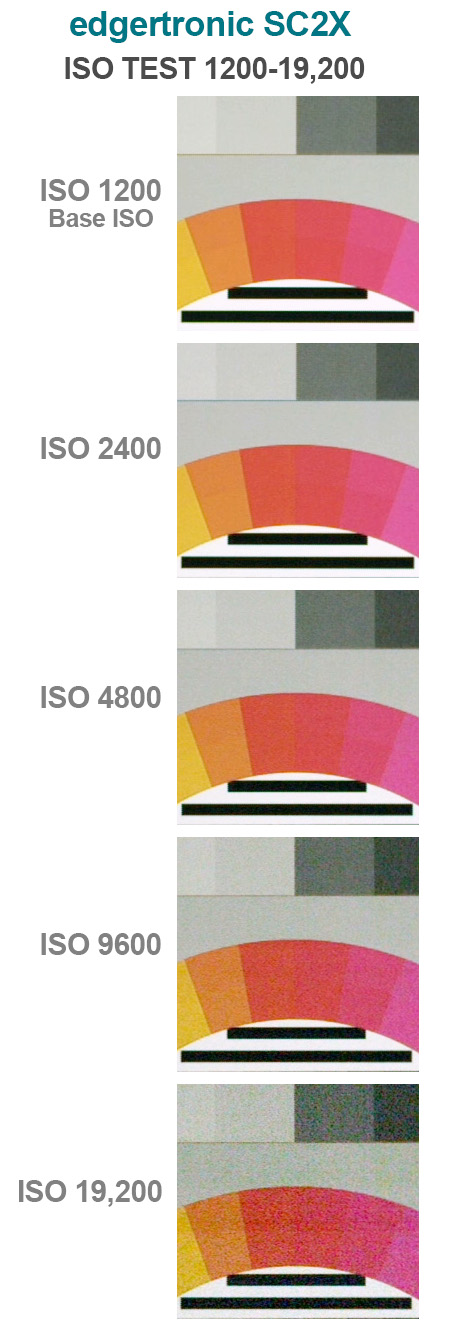
Banding starts to appear at ISO 9600 so ISO 4800 should be ok for the highest quality in lower light levels. We took these tests in full LED 1000w equivalent lamps at 30fps. Only shutter-speed was altered to compensate for the ISO variance.
However, the camera can move up the ISO scale by single units so you can experiment up by 1 digit increments until you get the desired result. We used ISO 5,220 with good results as we needed more light for a few shots.
edgertronic SC2X ISO test & Neat Video Profiles Applied:
Using Noise Reduction Software with edgertronic SC2X:
Neat Video is your friend: Looking at how the noise is compressed by the H.264 codec it’s apparent not much is being thrown out compared to a RAW or high-quality JPG image. Neatvideo is an application for video editors and compositing applications like After Effects; that analyses video footage frames and averages the noise out with some very clever algorithms for retaining image detail. We created some profiles at ISO 1200, 2400, 4800, 9600 and 19200. You can see the results in the video above. It is clear the performance of Neat Video in the latest v4 is much better in preserving detail while getting rid of even some banding at higher ISOs.
We created the profiles from ISO1200 to ISO 19200 out of 50% Grey frames for the edgertronic and for use in Neat Video v4.0.
Download Profiles for Neat Video v4 for the SC2X Here:
 Download Free Neat Video Profiles for the edgertronic SC2X Here<<<
About Menu:
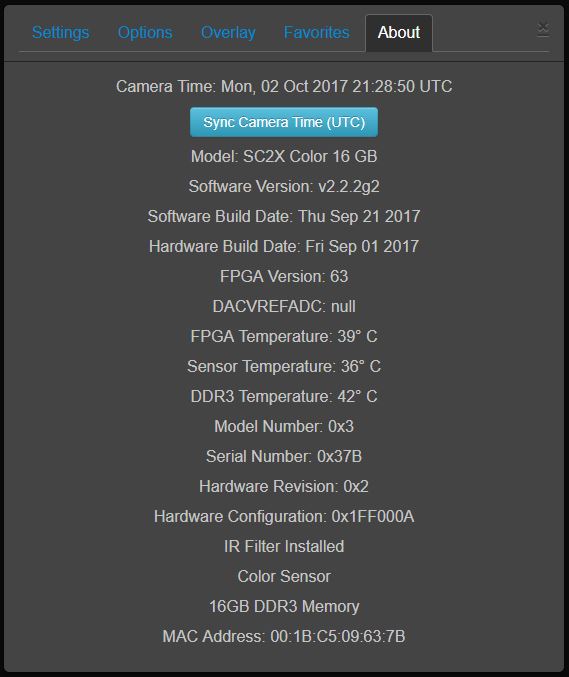
-Sync Time: Will modify the camera’s time to your computer browser’s time. This is useful if you are shooting in a different time zone and want to keep track of the time there in your shots this is a handy way.
-About This Camera: This button will tell you hardware information among other parameters like time, date, software version, hardware information like color or monochrome and memory configuration. The most useful ones for the average user would be the MAC Address, time/date and the temperature of the sensor and FPGA processing circuitry. It is good to have access to the internal temperature to see if the camera is overheating and or at what temperature the sensor starts to degrade image quality. Too cool a sensor and or too hot makes image quality not optimal.
During our testing camera never overheated or locked up. It is a very solid product that is built for 24/7 year-round operation if needed.
Some more important points:
The edgertronic software is in constant evolution. Features like overlay, Favorites and multi-shot “Shotcount”, and Review before saving were not available at first with the SC1 camera but now are, this is a great thing for people that want their camera to grow in functionality over time. All software updates are free of charge to all edgertronic owners.
The http://wiki.edgertronic.com/ edgertronic wiki page is also a great resource for users of the camera to get the latest on development, footage samples and more on the camera and it’s community of users.
SDK For Camera Customization & Programming:
There is a robust SDK for software developers that want to customize the edgertronic for custom installations. You can get more information about it here. This makes the platform ideal for a variety of custom applications.
Many edgertronic customers have used the SDK with success in labs, testing facilities, education and multi-camera setups that can really take the camera and it’s time recording possibilities to the next level. You can program it to record and sync with other edgertronic cameras using Genlock for example to create a custom rig for TV or Film sets. A series of SC2X cameras shooting from different angles could really make an average shot, a truly incredible visual reward to the senses. The relatively low cost of the camera means you could build a 6 camera slow motion setup for the price of a single camera competitor’s rig. We expect to see the SC2X being used in these types of setups which will make the art of super slow motion capture evolve to higher aesthetic levels.
We expect to see the SC2X being used in these types of setups which will make the art of super slow motion capture evolve to higher aesthetic levels.
Moire and Aliasing:
During the review of the camera, some shots exhibited color moire and some aliasing in very detailed textures and diagonal lines. This is not a problem for the majority of shots and it is a clear improvement from other 720p edgertronic cameras. 1080p resolution makes shooting detailed objects much less of a problem with ample levels of detail retained in the frame without seldom an artifact.
The effect will be visible on the monitor at capture time so you can tell if it will show up beforehand. The edgertronic SC2X has an excellent sensor with very good characteristics which suffers very little from aliasing and moire.
See the ISO video test above for a detail vs Low pass filter live comparison!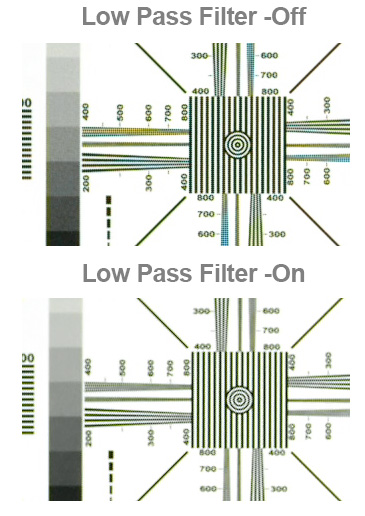
As you can see in the test above of a resolution chart, the edgertronic SC2X has excellent detail but does have some color moire when lines get too close. This is normal for all sensors that use the Bayer color array. The edgertronic itself does not have an optical low pass filter installed which means the camera will allow all available detail to be recorded. We installed an optical low pass filter on demo camera temporarily to essentially create an OLPF effect. As you can see moire and aliasing are gone using this method, the resolution does take a small but perceptible hit if using a filter.
If you need a shot that needs to be free of moire and aliasing, you can use an OLPF and have it done with good results “We used a modified filter for our test. There is no OLPF made for edgertronic cameras that we know at this time”. Search around for OLPF filters on Google as they can be purchased relatively free. Trial and error is a must since OLPF can be too strong or weak depending on the camera they are being applied to.
We encourage you to have a large monitor to be able to spot such artifacts before recording in case they show up. The camera like many recent DSLRs and Mirrorless are shipped without an OLPF which makes aliasing and moire an unavoidable trade-off. However, this way you get the most detail possible from the sensor with no artificial softening.
We consider the absence of an OLPF a plus feature for the SC2X camera and not a negative.
Wrapping Up Review Part 2:
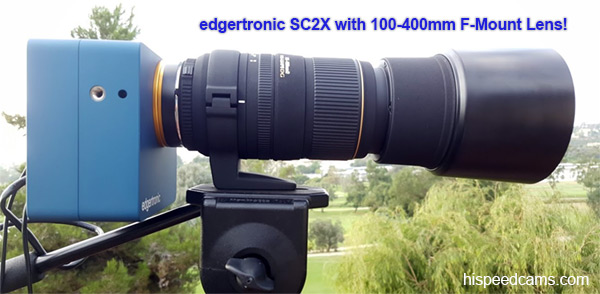
Using the edgertronic camera over the last month, and being able to see how it performs in a variety of situations has been a very interesting experience.
Shooting with the camera is a rewarding endeavor that will have you looking for new angles and subjects to shoot every day. You will be getting better at catching action and setting up shots in a few days of use and will make you a certified expert in a few weeks.
The camera is very user-friendly and has a lot of features to help you in getting the shot quickly. understanding how to best tailor the hardware to your needs will take a few sessions. The ongoing development of features is a plus and gives the camera room to grow and expand what it can do.
Over time you will start to think of even larger slow motion shoot projects than what seemed possible at first and the limit will be your imagination. You will easily run out of ideas before the camera has run out of frames. The SDK extensibility will also allow you and or your team to create customized rigs of multiple cameras for demanding video production environments for TV or Film.
The edgertronic SC2X is built on a mature product platform which inherits years of hardware and software development on a very solid & dependable platform. You get to finally have 1080p full HD high frame rates in what is essentially the same camera platform in shape and size to previous edgertronics.
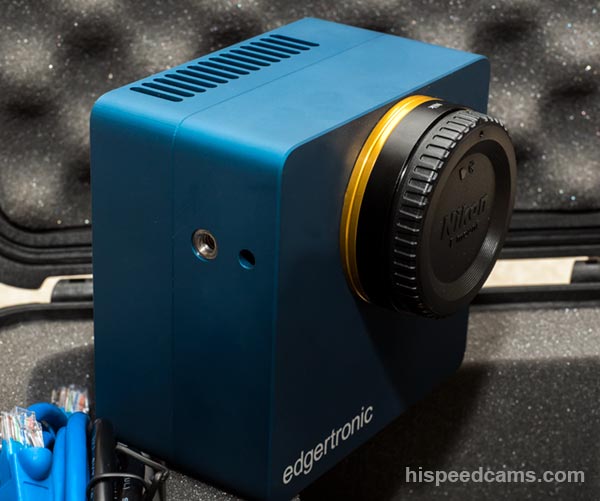
You can just replace the camera by swapping it on your lab or studio and you are up and running. The cameras share the same user interface and the learning curve is the same. If you are an edgertronic SC1, SC2 or SC2+ owner, the SC2X is a clear image quality/resolution upgrade ready for demanding video production requirements and new levels of resolving power compared to 720p cameras. 1920*1088 pixels is a pretty huge leap to 720p HD and at near 2000fps you are not loosing much in the way of high frame rates. At this point, we can safely recommend the SC2X for your video and Film production needs without hesitation.
The quality of the files, noise pattern and resolution achieved are class leading when compared to many competitive cameras. A number of quality shots you will achieve will only be limited by your imagination and or will to prepare the shots, not by the hardware possibilities.
Over part 3 of this review, we will be looking at portability out on the field, rigging and recommendations for the future of the edgertronic as-well as the final verdict for the SC2X and why we feel this might be the camera you have been waiting for in the affordable slow-motion camera space. Coming Soon!
Thank you for reading and your support of HSC, it allows us to keep bringing you the latest info, rumors, videos and reviews in the world of affordable high-speed imaging.
- For more information about the edgertronic SC2X camera including ordering information please visit http://edgertronic.com/
- Comment about this review below!

